Schedule Item dialog box
Auto FTP comes with flexible scheduler. You can schedule auto-recurring transfers for any future data and time. The Schedule Item dialog box will help you specify values for scheduled automated transfer items.
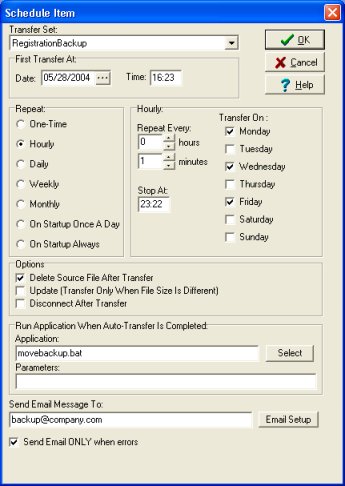
You can access the Schedule Item dialog box from the Transfer Scheduler window.
- In the Transfer Scheduler window click New.
- In the Transfer Scheduler window select item in the Scheduled Transfers list box and
click Edit.
The Schedule Item dialog box will help you specify values for scheduled automated transfer items.
- Select transfer in the Transfer Set box. If the list is empty you have to create a valid transfer set (creating transfer set).
- Select the day in the Date box when you want the first auto-transfer to be activated. Enter the time in the Time box when you want the first auto-transfer to be activated.
- Select transfer frequency in the Repeat section. For the selected frequency select additional parameters.
- Optionally you can define additional actions in the Options, Run Application, Send Email sections.
- Click OK.
First Transfer At (start first transfer)
First Transfer At: define the date and time for the first transfer. Time setting in "First Transfer At" determines the start for the transfers. For example, if Time is set to 08:00 an Hourly transfer will be active between 8 am and midnight and always stop between midnight and 8 am. Enter 00:01 into the Time edit box if you want to make transfers run continually.
Repeat (transfer frequency)
Select the type of Scheduled Item by clicking on one of the Repeat radio buttons:
- One Time for non-recurring transfers.
- Hourly for transfers that will be repeated every x hours and minutes on selected days.
- Daily for transfers that will be repeated on selected week days e.g. Mondays and Wednesdays.
- Weekly for transfers that will be repeated once a week e.g. every Sunday.
- Monthly for transfers that will be repeated once a month, or on selected range of days.
- On Startup Once A Day for transfers that will be repeated every time AutoFtp is launched but no more than once a day.
- On Startup Always for transfers that will be repeated every time AutoFtp is launched.
Options
- Check Delete Source File After Transfer if the source file should be deleted after a successful transfer. For Downloads the remote files will be deleted and for Uploads the local files will be deleted.
- Check Update option if a file should be transferred only if both local and remote files have a different size.
Run Application When Auto-Transfer Is Completed
- Type in the full path to the application into Applicationedit box e.g. c:\windows\notepad.exe. Or, click Select and select the apllication file.
- Type in any command line parameters into Parameters edit box
Send Email Message To
- Type in the email recipient address into Send Email Message To edit box. If you have not used this option before click on Email Setup button in order to set up your email server parameters.
Send Email ONLY when errors
- When checked email notification messages are sent only when there were errors in the auto-transfer.