Important

  • Organizer Advantage and Handy Managers are replacing Deluxe/Pro software.
  • We recommend our new software to Windows 10, 11, and above users.
  • We continue supporting all Deluxe/Pro users but do not plan to release updates.

New Software for Windows: review, download, and test


Compare


Organizer Deluxe & Organizer Pro Help Center

   Database Management FAQ >Search Utility:
Library Software FAQ >Library Add-ons >Library Search Utility:

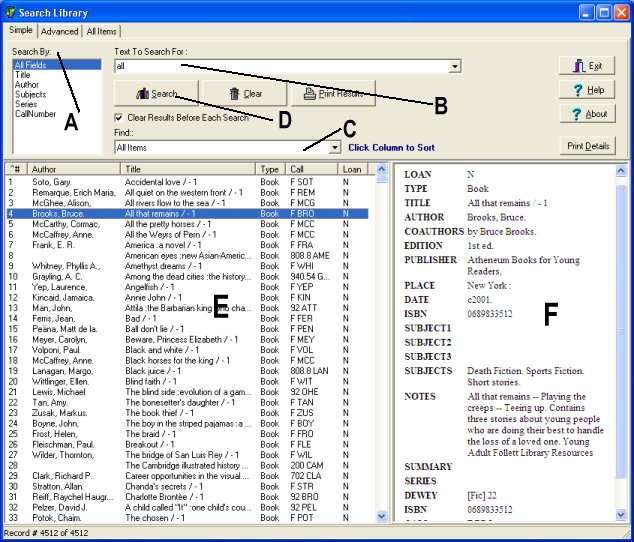
Question/Topic: Library Search Utility (OPAC).

How to use Search Utility
How to customize Search Utility
How to setup Search Utility on the Network


Search Utility is a stand-alone application. Search Utility allows you to process search transactions without launching Organizer Pro software. Your Organizer Pro databases are protected from unwanted modifications or deletions. Search Utility can be used on one computer or on the network. The below example explains to you how to implement Search Utility with our Library Pro Solution. You can use Search Utility with any Deluxe or Pro database solution.


Library Search Utility allows your library members to process search transactions without launching library software. Your library databases are protected from unwanted modifications or deletions. Search Utility can be used on one computer or on the library network.


How to use Search Utility

  • Select the field that you would like to search in the Search By (A).
  • Enter one or more search words in the Text To Search For (B).
  • Select the number of results in the Find (C).
  • Click Search to perform search (D).
  • Your results will be listed as a list in the Search Results table (E). You can define what information is listed in the Search Results table (search.ini file).
  • Click on any item in the list to display item details in the right section (F).


library search utility, opac


How to configure Search Utility
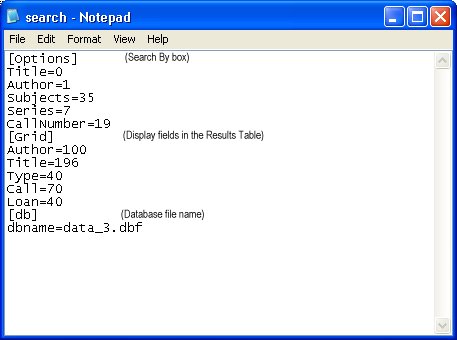
  • Search configuration files are in the Search folder: search.ini, searchf.ini.
  • You can open search configuration files with any text editor (example: Windows Notepad)
  • Search configuration files allow you to define:
    - which fields are included in the Search By drop-down box (A)
    - which fields will be displayed in the Search Results table (E)
    - which database will be searched
    - which fields will be displayed in the Detail Display section (F)


search.ini


Explanation:
Title=0
"Title" label used in the Search By box
0 position of data field in the database (starting from 0)

Author=100
Author field will be displayed in the Results Table, the column width will be 100 pixels.

dbname=data_3.dbf
This file will be searched.
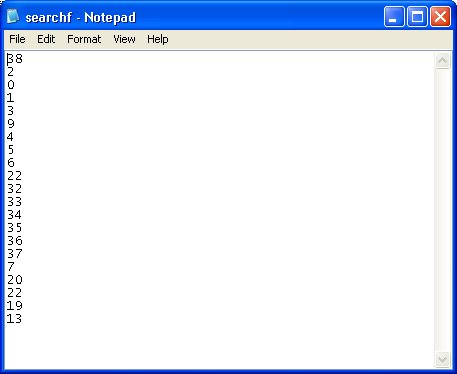


searchf.ini


Explanation:
Number represents the data field position in the database (starting from 0). This field will be displayed in the Details Display section.


Network setup for Search Utility:

  1. Install Organizer Pro on a server (or dedicated PC) on a shared drive that is accessible from other workstations. Make sure the Organizer main folder has full access permissions for all users.
  2. On the server, locate your Organizer main folder and run Bdesetup.exe. Follow all the steps of Bdesetup.
  3. On every workstation that will be accessing Organizer map the Organizer main folder on the server to a local drive you used when running Bdesetup program (e.g. Z:). Use Windows Explorer (Tools/Map Network Drive) to do this.
  4. On every workstation create a shortcut on the Desktop pointing to Search.exe file on the shared drive.
  5. Before you run Search utility double-click on bde32.reg file in Organizer folder (do it only once) and import it into the registry.

Related software (Read/Download) :
Small Library Organizer Pro
Church Library Organizer Pro


Copyright © PrimaSoft PC, Inc. All rights reserved.