|
|
Question/Topic:
How to install dataBase Browser?
STEP1: Define Web Site that will be assigned to our dataBase Browser.
-
Organizer dataBase Browser is installed as a part of our Organizers Deluxe or Organizers Pro. If you have downloaded it separately read how to unzip the downloaded files. The following files are supposed to be in your Organizer's main folder (C:\YOUR_ORG_MAIN_FOLDER\: orgdb.dll, orgdb.ini, data_N.ini (N could be 1, 2, 3,..). The following files are supposed to be in your Organizer's main subfolder (C:\YOUR_ORG_MAIN_FOLDER\ORGDB\): a_find.htm, db1.htm, dbleft.htm, dbright.htm, dbtop.htm, find.htm
-
Check if you have Microsoft IIS (preferably version 5.0 or higher) installed on your server. If you have access to the Internet Information Services Manager it means IIS is installed. See next topic.
-
In order to access our dataBase Browser through a Web browser you have to create a Web Site. To create a Web Site start Internet Information Services Manager (IIS):
(in Windows 2000 just click on Start/Programs/Administrative Tools/Internet Services Manager)
(in Windows XP just click on Start/Programs/Administrative Tools/Internet Information Services).
-
Using Internet Information Services (IIS) Manager select your server
-
Click on Action/New/Web Site and follow all the steps in Web Site Creation Wizard.
-
Make sure you give your site an IP Address of your server. If you are already using the same IP Address for some other web site you will have to use a different TCP Port for your new site (IP Address and TCP Port pair must be unique on your server).
-
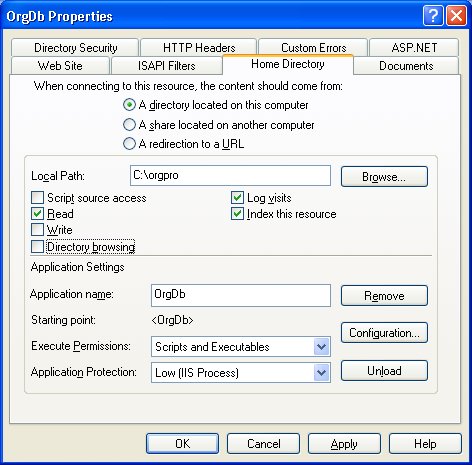
For the Home Directory use your Organizer main folder e.g. c:\orgpro\
How to check application main folder?
-
On the Web Site Access Permissions page check all items except for Browse and Write (Read, Run Scripts, Execute must be checked). Finally, click on Finish.
-
Once your web site is created right-click on it in IIS Console (left panel) and select Properties from the popup menu.
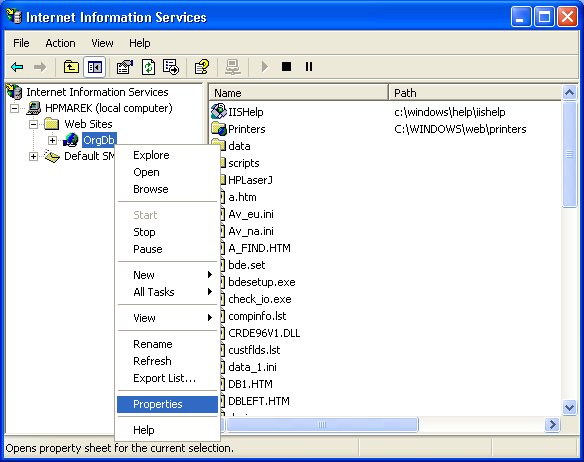
Now, select Home Directory tab and make sure it has the following options:
STEP2: Verify dataBase Browser setup files.
-
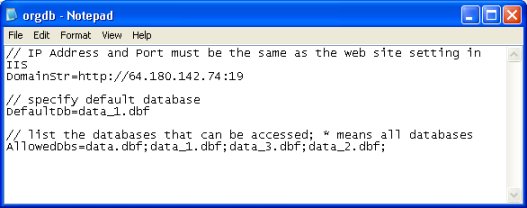
To complete the setup locate your Organizer main directory and find a file called orgdb.ini. Right-click on orgdb.ini file and select Open from the popup menu. You should see several lines of text, for example:
-
Modify DomainStr option to the same IP address (and TCP Port address if different than 80; e.g.: DomainStr=64.180.142.74:19 ) that you used when creating the web site. If you have a domain name registered for this web site you can use it here.
-
DefaultDb option allows you to specify which database should be displayed first.
-
AllowedDbs option specifies which databases can be displayed through Organizer dB Browser.
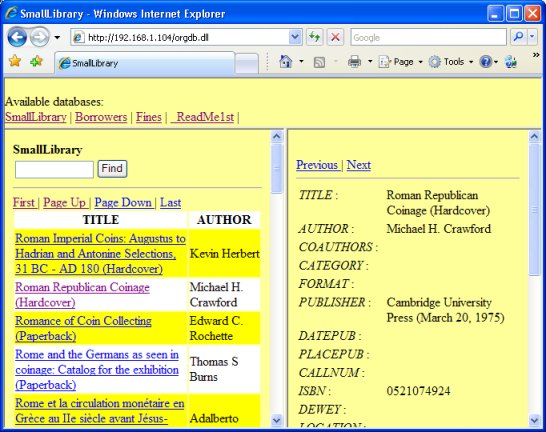
To verify that Organizer dB Browser is configured correctly start your web browser on the server and type in the following: http://64.180.142.74:19/orgdb.dll . If you see the screen similar to the screen below it means Organizer dB Browser has been configured correctly:
STEP3:Define database display options.
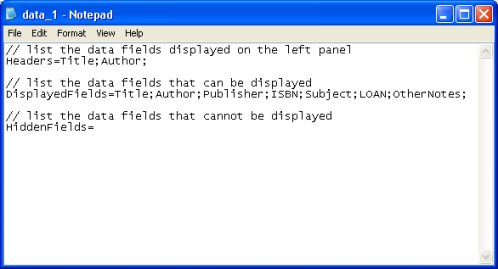
Each database can have different display settings. If your database file name is data_3.dbf you have to create a text file called data_3.ini in your Organizer main folder. This file should have the following options:
-
Headers - it specifies which data fields should be listed on the left panel. For example, it could look like this:
Headers= FirstName;LastName;
-
DisplayedFields - it specifies which data fields can be displayed in Organizer dB Browser. To display all data fields use *. For example, it could look like the following:
DisplayedFields=FirstName;LastName;
-
HiddenFields - specifies which fields should not be displayed and it is optional; if you have a lot data fields in your database it may be easier to specify DisplayedFields=* and then, just exclude some fields using HiddenFields option. It could look like this:
HiddenFields=CustomerID;
STEP4:Using Organizer dB Browser.
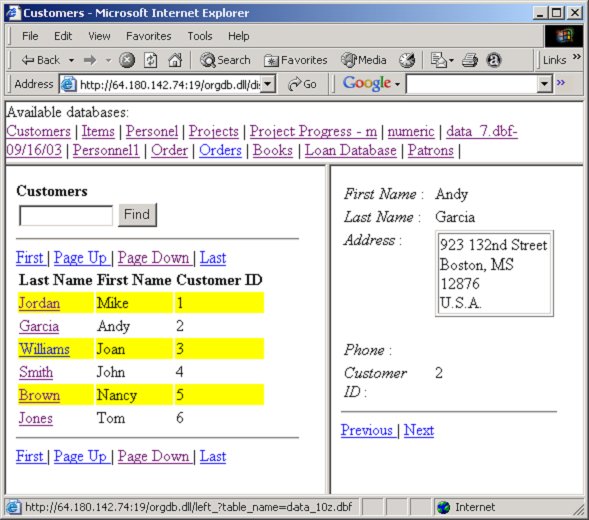
In order to display information from a database just click on one of the available databases. After that you should see a main database browsing window as shown below. The left panel of the window contains the first page of records (up to 30). In order to display more records click on PageDown or Last links on the left panel. Clicking on the record link (the first column on the left panel) selects a record and displays all the record data fields on the right panel. The top panel allows quick access to all available Public databases. In order to search the current database type in your search phrase into the edit box at the top of the right panel and click on Find button.
STEP5:Keeping Organizer dB Browser Running Smoothly.
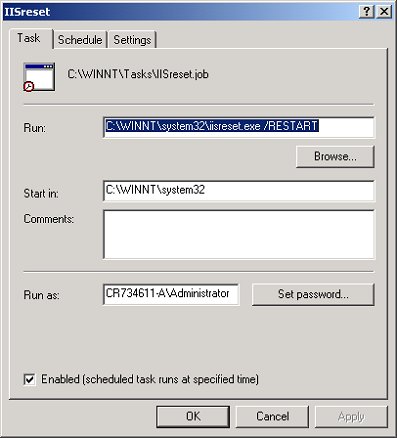
To make sure Organizer dB Browser is running as smoothly as possible we recommend that you restart IIS at least once a day (for example at night). You can do it by scheduling a task in Windows Task Scheduler (Control Panel/Scheduled Tasks) as shown below.
|
|