- Administrator
- Add data
- Add data, import
- Inventory
- Maintenance
- Calibration
- Circulations
- Manage circulations
- Print labels
- Print reports
- Borrowers
- Fines
- Reservations
- Installation
-
Options
- General
- Maintenance
- Change field names
- Add, edit forms
- Check in, check out
- Circulation rules
- Fines
- Send emails
- App. users
- Color Styles
- Modules - Databases
- Backup, Miscellaneous
- Supplies
Tool/Equipment check in/out processing options:
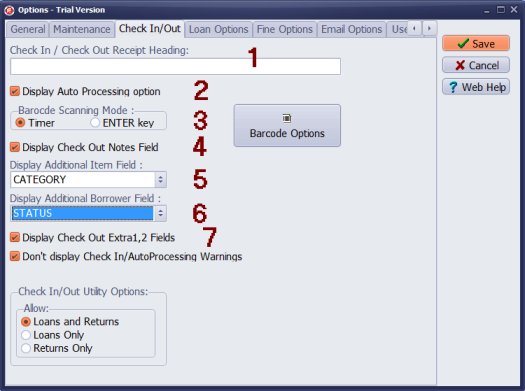
- Check In / Out Receipt Heading (1): define the heading that will be displayed on the top of the check out transaction receipt.
- Display Auto Processing Option (2): display Auto Processing check box in the transaction window. Use Auto Processing with barcode scanner and item/patron barcodes labels.
- Barcode Scanning Mode (3): if you use barcode scanner set the Timer, it will process the entry from the barcode after a very small time delay, set ENTER key if you enter barcode values manually or you use lookup feature when selecting items or patrons.
- Display Check Out Notes Field (4): enter any note when processing check out transactions. This note is recorded in the check out transaction.
- Display Additional Item Field (5): It is only displayed in the check in/out window. This value is not recorded in the check out transaction.
- Display Additional Borrower Field (6): It is only displayed in the check in/out window. This value is not recorded in the check out transaction.
- Display Check Out Extra 1, 2 Fields (7): you can display 2 extra fields from the Borrowers database in the check in/out transaction window. Define extra data fields in the loan.map file. The values from the selected fields will be recorded in the check out transaction. There is a JOB_PROJECT data field, you can record this value in the check out transaction. Later you can generate the following report: Tool/Equipment by Project/Job.
- Do not display Check In / Auto Processing Warnings: use this option when you process many check in transactions with a barcode scanner and auto-processing ON.
- Check In/Out Utility Option: decide what type of transactions could be processed in the Check In/Out module.
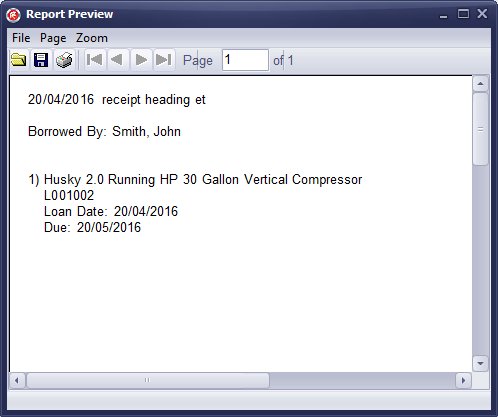
1 - Receipt Heading opiton.
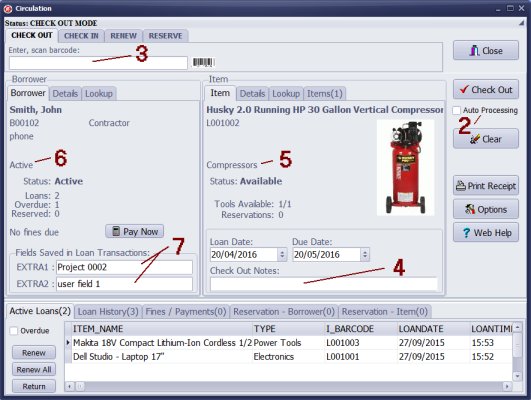
2 - Display Auto Processing Option.
3 - Barcode Scanning Mode.
4 - Display Check Out Notes Field.
5 - Display Additional Item Field (CATEGORY is displayed)
6 - Display Additional Borrower Field (STATUS is displayed)
7 - Display Check Out Extra 1, 2 Fields(they are linked to JOB_PROJECT, USER1 data fields)
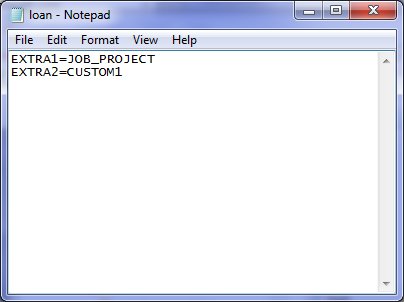
Extra data fields are defined in the loan.map file.
EXTRA1, EXTRA2 are data fields from the Loans table. JOB_PROJECT, CUSTOM1 are the data fields from the Borrowers table (you can replace JOB_PROJECT, CUSTOM1 with any field names from the Borrowers table).
When check out transaction is executed the program will save the value of the JOB_PROJECT in the EXTRA1 and CUSTOM1 in the EXTRA2.
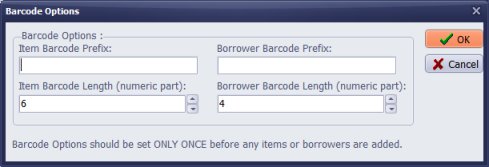
Barcode Options should be set only once before any inventory items or borrowers are added. If you do not enter your
barcode values the program will generate numbers in the format defined in the Barcode Options. In this case
items will have barcode values like: 000001, 000002, ,001999, borrowers will have barcode values like:
0001, 0002, , 0999
Latest calibration management articles:
Handy Calibration Manager for Windows:
Handy Calibration Manager
software tour
software features
download, try now
buy now
upgrade software
upgrade license
Equpiment, tool tracking software solutions:
- office inventory tracking with check in/out
- equipment tracking, tool crib tracking with check in/out
- av, media equipment with check in/out
- police equipment
- prison, equipment tracking with check in/out
- athletic, sport equipment tracking review
- calibration management software
Copyright © 2024 · All Rights Reserved · PrimaSoft PC