Organizer Advantage is powerful yet easy to use database manager for Windows.
Advantage Designer lets you modify our solutions or easily create new databases.
Take control of your data with our simple or buinsess database software solutions.
| Organizer Advantage HowTo/Help | Designer HowTo/Help |
Advantage Help > HTML Report Wizard > HTML Report Wizard - Window
- Organizer Advantage
- Getting Started Videos
- Main Window
- Tabbed Toolbars
- Add Data
- No Limits
- Reports
- Labels
- Search, Replace
- HTML Reports
- HTML Wizard
> HTML Wizard Window
- Save, Load
- Folders
- HTML Layout, CSS
- How To .. - Import, Export
- Free Data Setup
- Backup, Restore
- Options
- Statistics, Views
- Solutions
- Templates
- Add-Ons
- Install, Network
- Web Search, Add Data
- Premium
- Upgrade, Update
- Organizer Deluxe, Pro Users
- More
HTML Report Wizard Window: Settings, Commands, and Report Options
This page covers all controls in the HTML Report Wizard window - from the Go, Save, Load, and Delete commands to the four tab sections: General Settings (output folders), Data (field selection and grouping), Report Elements (1-, 2-, or 3-level structure), and Maintenance (HTML file naming). Each tab is explained with screenshots.
HTML Report Wizard options are grouped on tab pages. In order to create a report set your options.
Commands
Close: It will close the HTML Report Wizard Window.
Go: Define the settings, click Go to generate web pages. Note: If your HTML Report Directory contains old HTML files, they can be overwritten.
Cancel: To stop generating HTML pages, simply click Cancel at any time during the process.
Load: Displays the template window with all available templates. Click on the template name in the Existing Templates list box. To load the template, click on the OK button.
Save: You can save all settings from the HTML Report Wizard Window that you want to reuse in a template. Just define the settings on all tab pages, click on the Save button, and enter the template name.
Clear: Click here to set default parameters for all options included in the Report Wizard window.
Delete: Click here to delete the contents of your HTML report directory (use with caution).
View in Browser: Click on this option if you want to display the report in the browser immediately after the Go button is pressed.

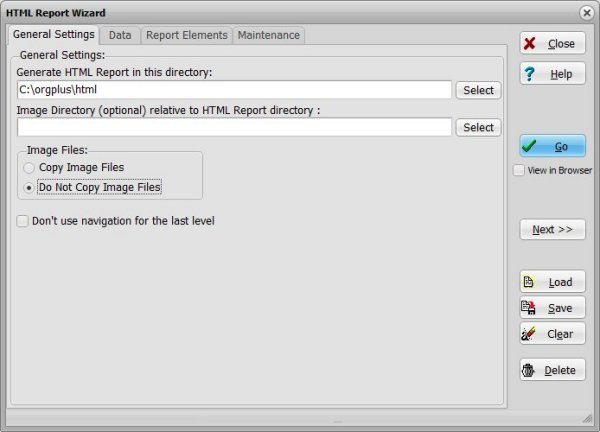
General Settings
Generate HTML Report in this directory: select a directory where all HTML files will be saved.
Image directory: select a directory where all image files will be saved. If empty, the HTML Report directory will be used.
Do not use navigation for the last level: select this option if you use the HTML template file for the last-level pages.
Data
This page lets you select fields from a table to include in the HTML report.
All Data Fields:
This section lists all data fields from the selected table. To select a field, highlight it and click the Green Arrow button.
To include the next field on the same line or column, click the Plus (+) button.
Selected fields will appear in the Selected Fields list box. To select all fields at once,
use the Double Green Arrow button.
To Remove a Field: Highlight the field. Click on the Red Arrow button.
The selected field will be removed from the Selected Fields list box. Click on the Double Red Arrow button to remove all fields.
To Change the Order of Fields: There are buttons with up and down red arrows below the Selected Fields list box.
When you click one of them, the selected field will move up or down by one position.
To Group Records: Select a "group by field" from the Group By dropdown box.
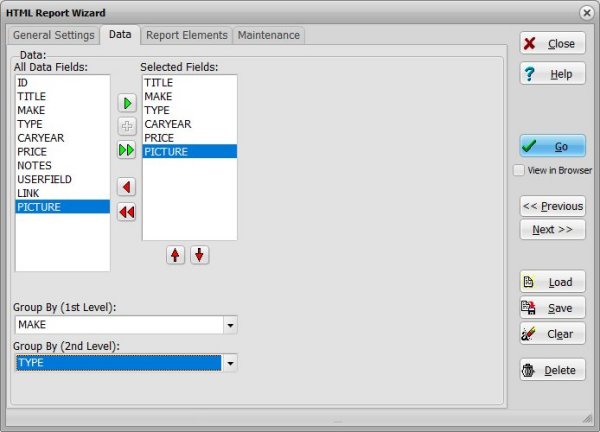
To Group Records in Separate Files:
Select a "group by field", go to the Report Elements Page, and select Report Type: 1-Level, 2-Level, or 3-Level.
In this case, the main report page (index.htm) contains a list of group names
with hyperlinks to the corresponding group files.
Order By: You can sort your data by one data field. This sort is used on the final HTML page.
Report Elements
This page allows you to select the report type. You can create a one page report or grouped reports split into separate pages.
Report Types
1-Level:
Generates a single HTML page containing the entire report body.
2-Level:
Splits the report into multiple HTML pages. The main page includes an index with hyperlinks to each group page.
3-Level:
Divides the report into three levels of HTML pages. The main page and second-level pages include indexes (groupings),
while the third-level pages display the detailed report body.
Note : You can only select 2-Level and 3-Level reports if you define the 'Group By 1' and 'Group By 2' data fields on the Data Page.
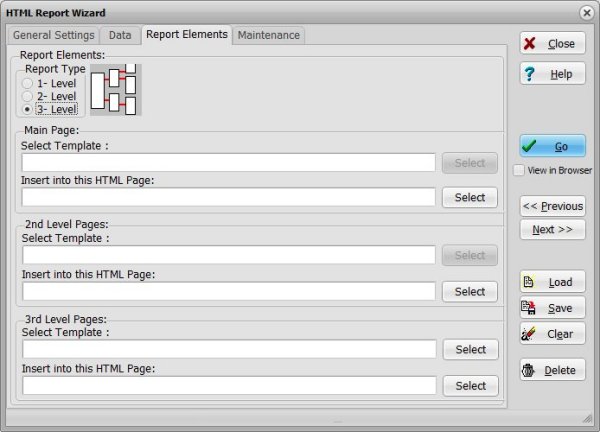
Select Template:
On the Data tab, choose the data fields you want to include in your report. The data will be displayed in table format
by default. You can customize the appearance with simple formatting by editing the style sheet section.
For final report pages, the program accepts HTML templates. You can design your own HTML layout and insert
keyword tags for data fields - these tags will be automatically replaced with the corresponding table data by
the HTML Report Wizard.
Insert Into This HTML Page:
You can embed any section of the report into an existing HTML document by including keyword tags in your HTML file.
The HTML Report Wizard will automatically replace each tag with the corresponding report section.
Keyword Tags:
<!--PRIMASOFT:BODY-->
- This tag is replaced with HTML code containing data from your table.
<!--PRIMASOFT:HEADER>
- In multi-level reports, this tag is replaced with a navigation line.
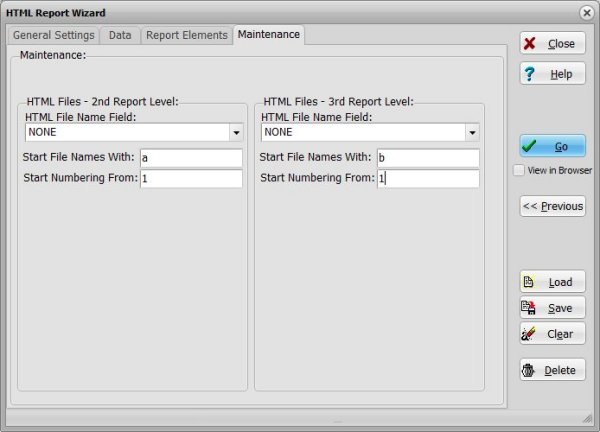
Maintenance
When you group data by one or two fields and select a report type with at least two levels, the HTML Wizard will generate multiple HTML pages. You have flexibility in naming these pages: you can use field values as file names or let the program automatically generate them.
HTML File Name Field:
Select a text field from your database to use its values as HTML file names.
Start Files Names With:
Specify a prefix for all HTML files generated by the program.
Start Numbering From:
Set the starting number for automatically generated file names. For example, if the prefix is
"test" and numbering starts at 100, the program will create files like "test100.htm", "test101.htm", and so on.
Depending on your choices, the program will either generate file names automatically or use values from fields such as MAKE and TYPE.
Program will generate HTML file names:
In this case the program will use MAKE and TYPE field values for file names:

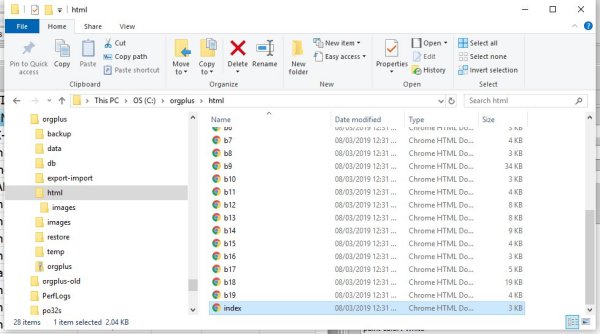
You can review all html files in the report folder.
Things to Know:
- Do not use navigation links for the last level if you are using a custom HTML page for final report pages. These pages typically display data from a single record and should not include program-generated navigation code. For example, when generating help pages, a fully customized HTML template is often used.
- When grouping at the first or second level, if you select a unique field for the final level, the program will create a single page per record.
Copyright © 2026 · All Rights Reserved · PrimaSoft PC