Organizer Advantage is powerful yet easy to use database manager for Windows.
Advantage Designer lets you modify our solutions or easily create new databases.
Take control of your data with our simple or buinsess database software solutions.
| Organizer Advantage HowTo/Help | Designer HowTo/Help |
Advantage Help > More > How to submit your data for conversion?
- Organizer Advantage
- Getting Started Videos
- Main Window
- Tabbed Toolbars
- Add Data
- No Limits
- Reports
- Labels
- Search, Replace
- HTML Reports
- HTML Wizard
- Import, Export
- Free Data Setup
- Backup, Restore
- Options
- Statistics, Views
- Solutions
- Templates
- Add-Ons
- Install, Network
- Web Search, Add Data
- Premium
- Update, Upgrade
- Organizer Deluxe, Pro Users
- Compare Deluxe/Pro & Advantage
- Upgrade To Advantage
> Submit Deluxe/Pro Data
- Upgrade Ratings - More
How to Submit Your Organizer Deluxe or Pro Data for Conversion
Transferring your data and solution from the Deluxe or Pro Organizer to Organizer Advantage is a crucial step when upgrading your software. This guide will walk you through the process of creating a backup, sending the file to us, and restoring your solution and data in the new Organizer Advantage application.
Step 1: Creating a Backup
Before you migrate to Organizer Advantage, it's essential to create a backup of your existing data and solution.
Option 1: Backing Up a Single Table
If you are working with a single table, follow these steps:
- Start the Deluxe or Pro Organizer.
- Open the table you want to back up.
- On the Advanced menu, click Maintenance.
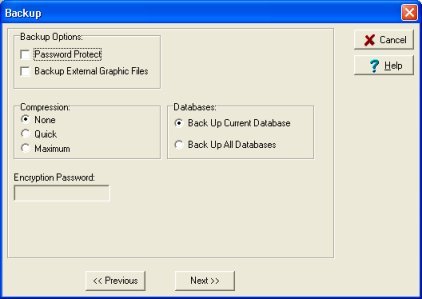
- In the Maintenance window, click Backup.
- Check the "Back Up Current Database" option.
- To start the backup process, click Next and Start Backup.
Option 2: Backing Up All Databases
If you have multiple tables or databases that you want to transfer, follow these steps:

- Start the Deluxe or Pro Organizer.
- On the Advanced menu, click Maintenance.
- In the Maintenance window, click Backup.
- Check the "Back Up All Databases" option.
- To start the backup process, click Next and Start Backup.
Option 3: Zipped Data Folder
Instead of using the built-in backup feature, you can also create a "compressed/zipped folder" of the "DATA" folder associated with your old program.
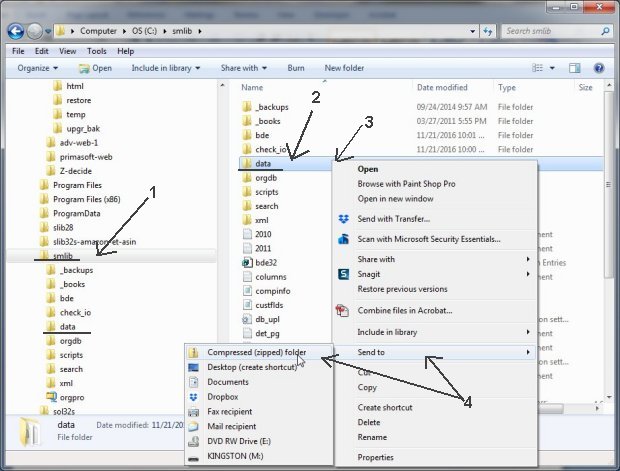
- Select your deluxe or pro installation folder (1).
- Select the DATA folder (2).
- Click with the right mouse button on the DATA (3) folder to display a popup menu.
- In the popup menu select Send To / Compressed (zipped) folder (4) (on your Windows this command could have a different name).
Step 2: Sending the Backup File
After creating the backup file, you need to send it to us for further processing.
Option 1: Email Attachment (For Small Files)
If the backup file is relatively small, you can send it as an attachment in an email. Follow these steps:
- Compose a new email.
- Attach the backup file to the email.
- Send the email to us.
Option 2: Cloud Storage (For Large Files)
For larger backup files, it's more efficient to upload the file to a web-based cloud storage service (e.g., Dropbox, Google Drive) and share the upload link.
- Upload the backup file to your preferred cloud storage service.
- Generate a shareable link to the uploaded file.
- Send the link to us via email.
Step 3: Review and Processing
Once we receive your backup file, we will review the data and process the transfer. Typically, this process takes about one business day, though the timeline may vary depending on the specific circumstances.
Step 4: Restoring Solution and Data
After we have processed your backup, you will receive two files from us. These files will allow you to transfer your solution and data to the new Organizer Advantage application.
Upon completing these steps, your solution and data from the old Deluxe or Pro Organizer will be successfully transferred to the new Organizer Advantage application.
For any guidance or instructions on restoring data in Organizer Advantage, refer to the app's documentation or contact support for help.
Copyright © 2026 · All Rights Reserved · PrimaSoft PC