Help, how to topics > Custom Views > How to create a simple custom view from databases in your equipment-tool manager?
This topic explains:
- how to create a simple custom view from equipment database
- how to use view assistant
Using the View Assistant feature, you can create a simple custom view (SQL query) with data from up to two tables.
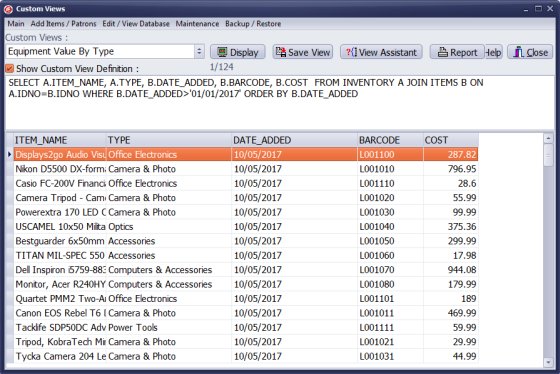
Custom View Example:
The view will use two tables: INVENTORY and ITEMS (there is one-to-many relation, it means you can have many instances of the same equipment or tool).
The view will display four data fields: ITEM_NAME, TYPE from INVENTORY table, and BARCODE, DATE_ADDED, and COST from ITEMS table.
There will be simple filter: only items added in 2017 will be displayed.
Items will be ordered by DATE_ADDED.
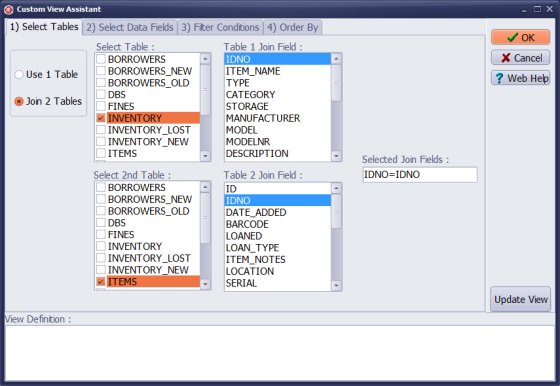
Click Join 2 Tables.
Select 1st table: Inventory. Select 2nd table: ITEMS.
View Assistant automatically selects Join Fields (for some tables join fields have to be selected from the list).
Click Select Data Fields tab.
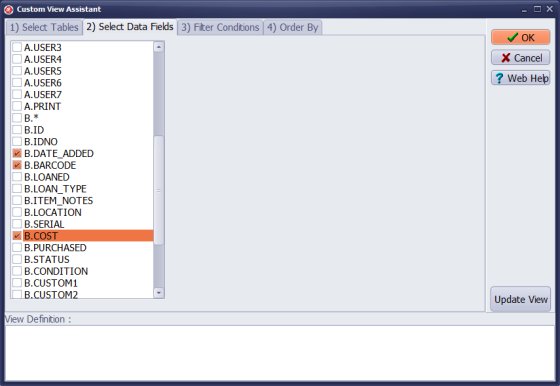
On this page you define data fields to be displayed in the view grid. Initially all data field from two tables are selected (A.*, B.*).
In this view definition the following data fields are selected: A.ITEM_NAME, A.TYPE (A=INVENTORY table), B.DATE_ADDED, B.BARCODE, B.COST (B=ITEMS table).
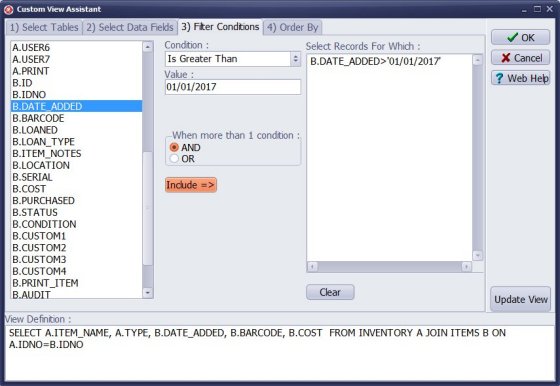
Click Filter Conditions tab (optional).
Define filters (filters will limit the number of records displayed to a certain range).
The following filter is defined: B.DATE_ADDED > 01/01/2017 (display only items that were added in 2017).
Click Update View to generate View Definition.
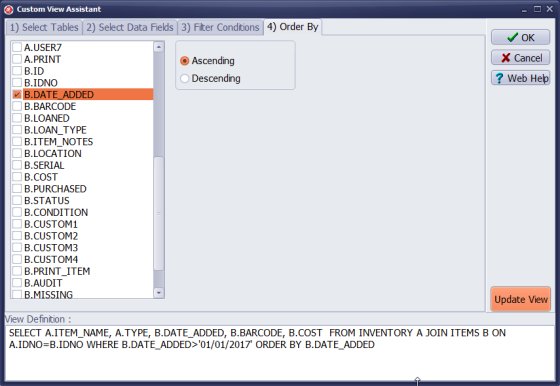
Click Order By tab (optional).
Define the sort field for your custom view.
Click Update View to generate View Definition.
Click OK in the View Assistant. It closes View Assistant and loads the newly defined view into the Custom View Definition box.
New view definition is displayed in the Custom View Definition box.
Click Display to activate the view.
Click Save View to save the view for future use.
If you know the Firebird SQL language you can enter or modify the definition.
Review ready-to-use custom view definitions.
Questions:
We offer Handy Library Manager application for libraries that includes the same custom views/statistics functionality. In addition, you can find more how-to and sample topics in the Handy Library-Custom Views-Stats help section.
Latest equipment tracking how to articles:
How to email overdue notices to borrowers?
How to predefine email messages?
How to set automated emails with your Gmail account?
How to set automated emails with your Office365 account?
How to display checked out items in the equipment main inventory?
How to modify due dates for the checked out equipment?
Customized check-out receipt, include all items.
How to send email messages to all equipment users?
How to print group-by reports where each group starts on a new page?
How to export data from a custom view?
How to print, email check-out receipts?
How to modify the grid (number of columns, column size, column position)?
Handy Equipment Management with Check In/Out:
Handy Equipment-Tool Manager
tour
features
try now
cloud
Equpiment, tool tracking software solutions:
- office inventory tracking with check in/out
- equipment tracking, tool crib tracking with check in/out
- av, media equipment with check in/out
- police equipment
- prison, equipment tracking with check in/out
- athletic, sport equipment tracking review
- calibration management software
library software packages (included with handy e-t software):
school library
church library
non-profit org. library
business library
community library
small public library
Copyright © 2024 · All Rights Reserved · PrimaSoft PC