Help, how to topics > Check In/Out > How to customize check out transaction receipt and include all items?
How to customize check out transaction receipt and include all checked out items? (v3.0)
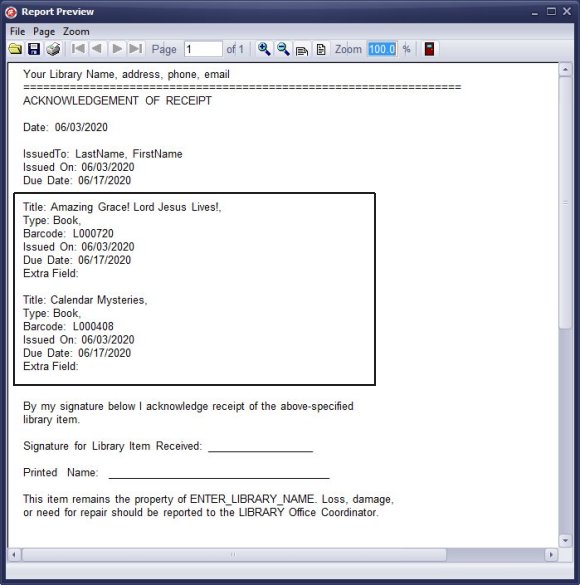
Beginning with version 3.0, you can now include all checked-out items in the customized receipt.
There are two new keywords that let you display all transaction items:
<LIST_START>
<LIST_END>
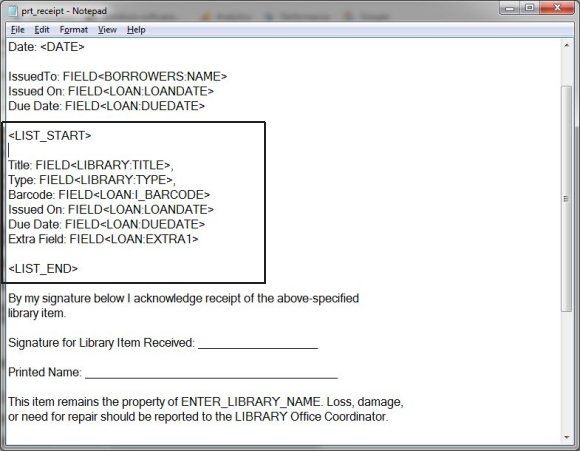
Custom receipt is defined in the prt_receipt.txt file.
Handy Library checks if there is a receipt file (prt_receipt.txt) in the data folder (C:\handy_lib\data\db\), if yes then custom receipt is created, if the file is not present the regular receipt is created.
Download the prt_receipt.txt file, modify it, and save it in the data folder (C:\handy_lib\data\db\).
Use keywords:
<LIBRARY:TITLE> library main items table + item field name
<LIB_COPIES:BARCODE> copies table + copy field name
<BORROWERS:NAME> borrowers table + borrower field name
<LOAN:LOANDATE> loan transaction table + loan field name
Keywords in the form are replaced with data from the check out transaction.
Question:
Add text to check out receipt. We need to add a disclaimer and
signature field to the check out report so it can be printed and have the borrower sign it. Where can I enter this information?
Answer:
You need to create the prt_receipt.txt file,
which specifies the format of your receipt.
It should include a disclaimer and a signature area.
Handy Library Manager 4.5, review new features
Inquiries from Librarians and Libraries
ISBN Book Finder And Cataloging Tool
Library Web Search, review new web search
How to print replacement labels?
Getting started library video lessons
How to include library name on labels
Library, Data Entry Form Designer
Edit item or borrower data in the check-in/check-out window?
Link item lost fine with the PRICE data field?
Handy v3.2 supports letter tabs?
How to predefine library email messages?
How to update library data from the web with ISBN?
How to predefine library email messages?
Compilation of questions and answers from library requests will help you to make purchase decision.
How to verify if the item is checked out in the library main catalog window?
How to create a new record using Copy Selected Item?
Special Library, how to manage digital and paper document library?
What is the maximum number of library items?
Library Software for Small Libraries, Windows application
Handy Library Manager
small library software
library tour
library features
try now, download
cloud
library software reviews
Copyright © 2026 · All Rights Reserved · PrimaSoft PC