Help, how to topics > Options > Library check in, check out options?
-
Options, Customize
- general options
- maintenance
> check in/out options
- loan rules
- fine, future fines
- email server options
- users
- color styles
- additional modules
- cover image
- change field names
- listboxes, dropdown lists
- edit category list
- predefined lists
- rule, checkout not allowed
- set user id and password
- barcode length
- data entry form designer
- define add/edit forms
- data view page designer
- databases, field names/positions
Library check in/out processing options.
The check-in/check-out window is where you process loan and return transactions. On this page, you can define the options that are best for your library.
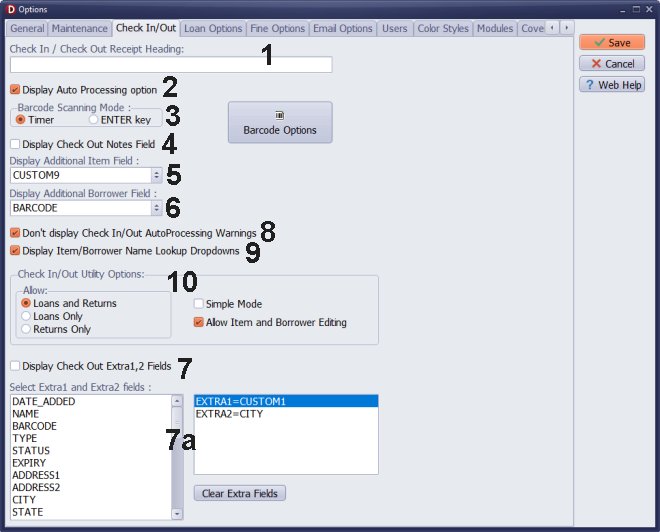
- Check In / Out Receipt Heading (1): Define the heading that will be displayed at the top of the check-out transaction receipt.
- Display Auto Processing Option (2): Check this option to display the Auto Processing checkbox in the transaction window. Use Auto Processing with a barcode scanner and item/patron barcode labels.
- Barcode Scanning Mode (3): If you are using a barcode scanner, set the timer to process the entry from the barcode after a very short delay. If you are manually entering barcode values or using the lookup feature to select items or patrons, set the ENTER key for this purpose.
- Display Check Out Notes Field (4): Administrators are allowed to enter notes when processing check-out transactions. These notes will be recorded in the check-out transaction.
- Display Additional Item Field (5): Define an additional item data field that will be displayed. This field is only visible to library administrators for data verification and will not be recorded in the check-out transaction.
- Display Additional Borrower Field (6): Define an additional patron data field that will be displayed. This field is only visible to library administrators for data verification and will not be recorded in the check-out transaction.
- Display Check Out Extra 1, 2 Fields (7): You can display two extra fields from the Borrowers database in the check-in/out transaction window. Define these extra data fields in the loan.map file. The values from the selected fields will be recorded in the check-out transaction. For example, if you have grade-2 students, you can enter the teacher's name and grade into the student record; both can be recorded in the loan transaction.
- Define Extra 1, 2 Fields (7a) : You can define extra data fields in the options, which will be saved in the loan.map file (new feature in version 4.0).
- Do Not Display Check In / Auto Processing Warnings (8): Use this option when processing check-in transactions for multiple books using a barcode scanner.
- Display Item/Borrower Name Lookup Dropdowns (9): You can display lookup dropdown boxes. Small libraries that do not use barcode scanners can easily access item and borrower selection. Lookup boxes allow you to find an item or borrower by typing the first few letters. (New feature in version 2.4, July 2017)
- Check In/Out Utility Option: Decide what types of transactions can be processed in the Check In/Out module.
- Simple Mode (10) The Check In/Out utility allows an operator to override predefined parameters (such as due date, quantity limits, and transaction notes). The Simple Mode option lets you disable these override features. (New feature in version 2.4, July 2017)
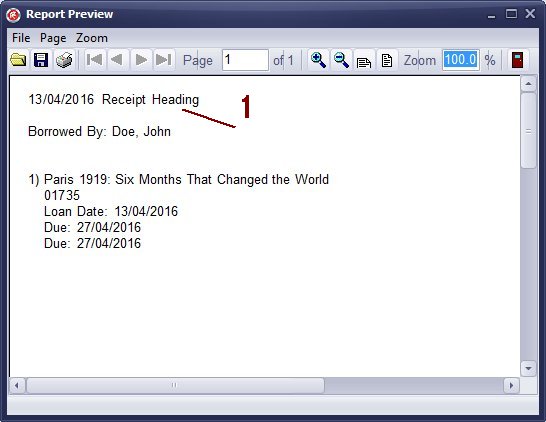
1 - Receipt Heading opiton.
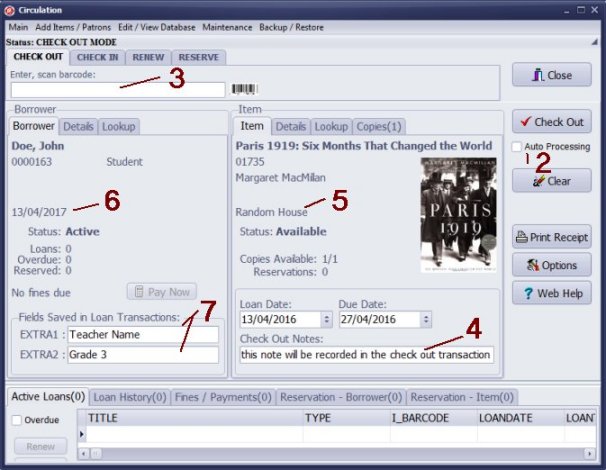
2 - Display Auto Processing Option.
3 - Barcode Scanning Mode.
4 - Display Check Out Notes Field.
5 - Display Additional Item Field (publisher is displayed)
6 - Display Additional Borrower Field (expiry date is displayed)
7 - Display Check Out Extra 1, 2 Fields (7a - define extra fields mapping)
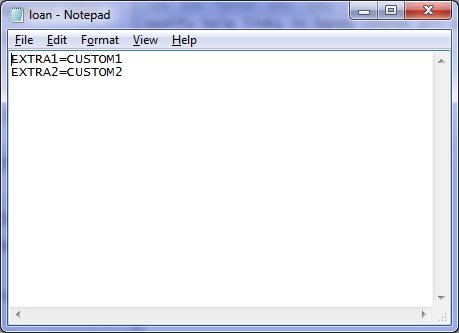
Extra data fields are defined in the loan.map file.
EXTRA1, EXTRA2 are data fields from the Loans table. CUSTOM1, CUSTOM2 are the names of the data fields from the Borrowers table
(you can replace CUSTOM1, CUSTOM2 with any field names from the Borrowers table).
When check out transaction is executed the program will save the value of the CUSTOM1 in the EXTRA1 and CUSTOM2 in the EXTRA2.
In the above example the Teacher Name is entered into CUSTOM1, the student grade is entered into CUSTOM2.
Those values will be stored in EXTRA1 and EXTRA2.
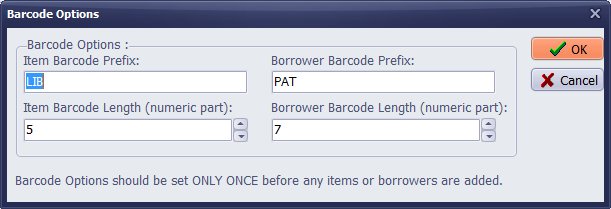
Barcode Options should be set only once before any items or borrowers are added. If you do not enter your
barcode values the program will generate numbers in the format defined in the Barcode Options. In this case
items will have barcode values like: LIB00001, LIB00002, ,LIB01999, borrowers will have barcode values like:
PAT0000001, PAT0000002, ,PAT0000999
Question:
I have downloaded the trial version of the software as I am hoping to
buy in the next few days, I just want to make sure that it has all the
functionality I need. In the version I downloaded there is no space to
add notes for checked out items (we need to add in about people
sharing books). However when I looked up tutorial videos, that option
is there. I am just wondering is it because it is not available in the trial
version or why do I not have this option?
Answer:
In the Check In/Out Options, set the Display Check Out Notes field. This note field will appear in the transaction window.
Question:
I am a middle school teacher running a small middle school library.
I am often not available to check books out for students since I also teach.
So students need to be able to easily check books out independently.
Problem 1:
I have set a 3-book limit for checkout...however when I try checking out more than 3 books,
I see a message that says "Max Number of items exceeded! The borrower should return some items first."
And then below is the option to override the 3 book limit .
Is it possible to make it so that students can NOT override the 3 book limit?
Kids taking way too many books is one of the main reasons we are switching to a new library system..so this is very important!
Problem 2: When I look at the check out/check in tabs, on the left hand side there is a button that says "return all".
But I don't want a kid to click "return" without actually having returned the books...this is why I have
volunteer librarians handle all book returns. Is there a way to disable this feature so that kids cant pretend to return a book while actually keeping it?
Answer:
In the Check In/Out Options, use the Simple Mode feature. In Simple Mode, students will not be allowed to overwrite transactions.
Question:
Were do we set the default start from Bar code?
Answer:
If you already entered library items, the program does not allow you to change automatically
generated barcode numbers. For the new library you can do the following:
- test library features
- run Empty Library
- reset database IDs
- set the initial number in the LIB_COPIES box.
Question:
Is there any way of making Auto Processing ON the default setting in the Checkin and Checkout screens (perhaps in the
Options screen). I worry that, should we adopt the program, our volunteer users will scan items in (or out) and forget to click
the Check In or Check Out button thus losing the transaction. Clicking in the Auto Processing box doesn't guarantee that
the option will be retained until it is un-clicked by the user.
Answer:
In the Check In/Out Options, set the Display Auto Processing option and use sound files for both check-in and check-out transactions.
sound files
Question:
In all your examples the ID displayed under the barcode is an L followed by six digits. My ID is a one-up counter, and so the number of digits will vary. I want a fixed-width ID so that the barcode width is also consistent. How do I do this?
Answer:
In the Options window, click on "Barcode Options" and specify the desired length for your barcodes.
Question: In all your examples the ID displayed under the barcode is an L followed by six digits. My ID is a one-up counter, and so the number of digits will vary. I want a fixed-width ID so that the barcode width is also consistent. How do I do this?
Answer: Click Barcode Options and set the length for your barcodes.
Question: I have the Handy Library Manager software at our library. On our library patrons fields, I have renamed one of the custom fields "Grade." I'm trying to figure out how to print out a list of students by grade with books loaned out, each grade on a new page. What I really want to do is provide a list of checked out books to each teacher. Since I cannot find a way to group students into a class, and we only have one teacher for each grade level, it seemed like this would be an easier way to do it.
Answer:
Utilize the "Display Check Out Extra Field" option (7) and modify the loan.map file. When a student checks out an item,
the teacher's name will be recorded in the loan transaction. By including the teacher's name in the loan transaction,
you can generate a report of checked-out items, organized by teacher.
Question:
I asked this question once before, and your answer was to edit the loan.map field so that EXTRA1=CUSTOM1.
I put each student's teacher in the CUSTOM1 field in the borrower information.
When I tried to open the loan.map file, the computer told me it doesn't have a program that will open it.
What program do I need? Assuming I could open the file and modify it, what would I do to create the report?
I am rather nervous about modifying a file like this, in case I do something wrong.
No one at my school is familiar with .map files. It would be much better if I could do a report like this without modifying
the loan.map file. In Small Library Organizer Pro I could sort and filter to set up reports for each class by selecting books
whose return date was empty, and entering a list of the students in the class that I wanted to include in the report.
Is it possible to do something like this?
Answer:
Utilize the Windows Notepad text editing application or any other text editor for your needs.
Question:
Would like to read more about barcodes.
Will Handy automatically start with the highest barcode and assign the next number in the
sequence when I enter new books into the collection?
We have a sequential numbering but there are several high values that are out of order
(probably typos). Can we set the bar code sequence number we want to start with?
Can we customize barcode label to read, can we customize Barcode number to be a
larger font and in bold?
Answer:
You can review what you need to know about certain data fields in the Library Main Catalogue table.
You can set the barcode length, but you cannot set the starting value.
What you need to know about some data fields in the Library Main Catalogue table?
Question:
A way to make check-in/check-out processing automatic? We have volunteers who forget to check auto processing,
so they think the books are checked out when they are not.
Answer:
In the Options window, set the barcode scanning mode to Timer. Do not enter an EXPIRY
value in the borrower records. When this value is empty, it will not trigger the member expiry rule.
Question:
Is there a way to customize the Item display in the Check In/Check Out module?
We would like to be able to see Format as well as Type...
Answer:
You can include only one additional piece of information about the item. Review the option for displaying the additional item field (5).
Handy Library Manager 4.5, review new features
Inquiries from Librarians and Libraries
ISBN Book Finder And Cataloging Tool
Library Web Search, review new web search
How to print replacement labels?
Getting started library video lessons
How to include library name on labels
Library, Data Entry Form Designer
Edit item or borrower data in the check-in/check-out window?
Link item lost fine with the PRICE data field?
Handy v3.2 supports letter tabs?
How to predefine library email messages?
How to update library data from the web with ISBN?
How to predefine library email messages?
Compilation of questions and answers from library requests will help you to make purchase decision.
How to verify if the item is checked out in the library main catalog window?
How to create a new record using Copy Selected Item?
Special Library, how to manage digital and paper document library?
What is the maximum number of library items?
Library Software for Small Libraries, Windows application
Handy Library Manager
small library software
library tour
library features
try now, download
cloud
library software reviews
Copyright © 2026 · All Rights Reserved · PrimaSoft PC